Please make sure to enter your recovery email address correctly.
Losing your password is a common issue that anyone can experience. To help with this, we provide a password recovery service so users can reset their password.
However, one of the most important parts of the recovery process is the recovery email address entered by the user. In some cases, users enter their recovery email address carelessly or enter an incorrect email address when setting up their account. Unfortunately, in such cases, the password recovery email cannot be sent to the correct address, which may make recovery impossible.
In addition, due to the security design of our program, if you do not know the password, not only recovery but also deleting the program itself or accessing related data is not possible.
This is a necessary security mechanism designed to prioritize the protection of user data and prevent unauthorized access. Therefore, before you forget your password, it is very important to verify as soon as possible that your recovery email address is correct.
It is not too late to check now. We recommend reviewing your settings using the steps below.
Go to Settings, click the Change Password button, and make sure your recovery email address is entered correctly.
Check whether the registered recovery email address is the exact email address you actually use.
If there is a typo or if an email address you no longer use is registered, please correct it immediately.
There have been cases where recovery became impossible because the recovery email address was entered incorrectly. For example, if there is a typo or a non-existent email address was entered, the recovery email cannot be sent, and we will have no way to assist you. To prevent this situation in advance, it is important to make a habit of carefully checking your recovery email address when setting up your account.
If you have already entered the wrong recovery email address and are unable to recover your password, we ask for your understanding that recovery is unfortunately difficult at this time.
To avoid this situation, it is very important to enter your recovery information accurately when setting up your account in the future.
Today's News/Tips
How to Use the x264vfw External Codec
oCam supports external codecs (VFW), and here we will look at how to use the x264 codec.
You can download the x264 codec from the site below.
https://sourceforge.net/projects/x264vfw/
Go to the site and click the Download button.
The download will start automatically.
On the installation screens, just keep clicking Next.
Accept the license agreement.
Specify the installation path.
The installation is complete.
Click Finish.
After installing the codec, you must restart oCam before it will appear in the external codec list.
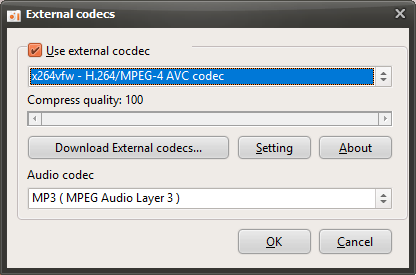
After restarting oCam, click the Codec button in the oCam main window, then click the External Codec menu.
Select the Use External Codec checkbox.
From the list, select x264vfw - H264/MPEG-4 AVC codec.
Then click the Settings button to view the detailed codec settings.
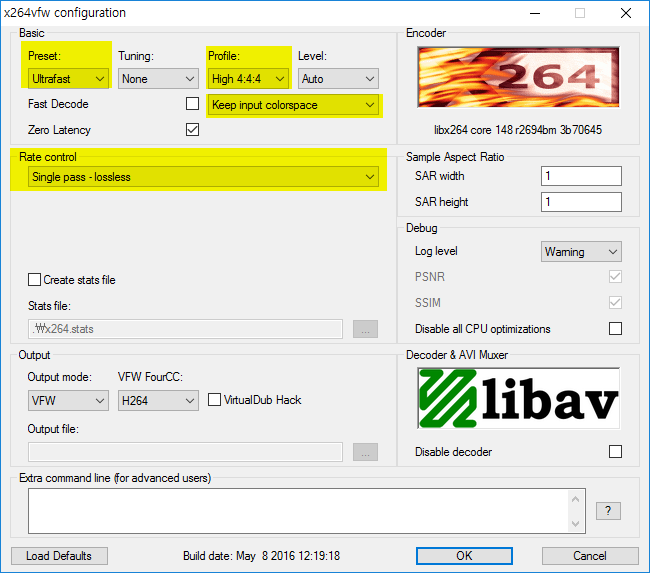
The codec settings window will appear as shown below. Since we need to record the screen in real time rather than perform normal video encoding, select Ultrafast in Preset and check the Zero Latency checkbox so that encoding is performed as quickly as possible, then click the OK button.
( This setting method is useful for real-time recording, and you can adjust it as needed depending on your situation. )
After configuring it this way, your recording will use the x264 codec.
* For game recording, if the game you want to record is 64-bit, you must also install the 64-bit version when installing x264vfw ( by default, it is installed automatically unless you change the installation options ). Then run x264vfw - Configure x264vfw64 from the Start menu and configure it the same way as described above.
* The x264vfw settings Keep/Accept only YUV 4:2:0, Keep/Accept only YUV 4:2:2, and Keep/Accept only YUV 4:4:4 are not supported, and recording will fail if you use those settings.