The system stutters during recording.
If your system becomes slow during recording or the mouse movement stutters, this is likely related to high system resource usage.
In particular, when trying to record high resolution or high frame rates with oCam, this issue can occur if your PC specifications cannot handle the workload.
To solve this, you can reduce system load by adjusting several settings.
First, after running the oCam program, click the Settings button on the main window.
When the Settings window opens, go to the Encoding tab at the top and check the related options.
In this area, you can adjust the Frames Per Second (FPS) setting. If the default is set to 30, try lowering it gradually.
For example, reduce the FPS step by step to 25, 20, 15, and 10, and check whether stuttering decreases.
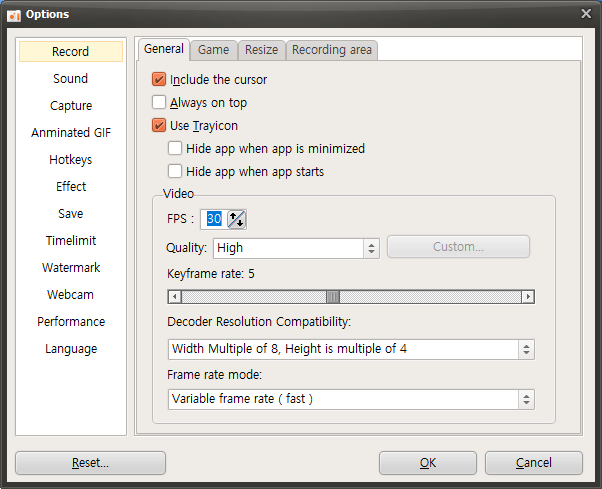
It is important to find an FPS value that is optimal for your PC specifications through this process.
Additionally, lowering the recording resolution or closing unnecessary background programs can also help reduce system load.
We recommend making these adjustments to balance system performance and recording quality.
Today's News/Tips
What to Do If Minecraft Crashes as Soon as You Start Recording with oCam (NVIDIA Graphics Card)
In Java-based applications that use CUDA, including oCam, problems may occur when certain NVIDIA drivers are installed. In particular, if NVIDIA driver version 378.49 (or some other versions) is installed, a bug may occur where the app crashes with the error "Stack cookie instrumentation code detected a stack-based buffer overrun" when calling the CUDA initialization function `cuInit`.
This issue is not a bug in oCam itself, but a problem with the NVIDIA driver that affects all applications that use CUDA. Therefore, the same error may occur not only in oCam but also in other CUDA-based Java applications.
To resolve this issue, you need to update the NVIDIA driver to the latest version, 378.66 or later. Follow the steps below to update the driver:
1. Go to the official NVIDIA website (geforce.com/drivers).
2. Select your graphics card model and operating system, then search for the latest driver (version 378.66 or later).
3. Run the downloaded driver installer and proceed with the installation.
4. After the installation is complete, restart your computer and run oCam or another CUDA-based application to check whether the issue has been resolved.
Updating the driver to version 378.66 or later will resolve the CUDA initialization crash issue and allow you to use oCam and other related applications normally. If the problem continues even after installing the latest driver, contact NVIDIA Support or check for the latest version of oCam.