oCam Advanced Settings - Save
Click Tools - Options on the oCam main menu to view the settings in the Save category.
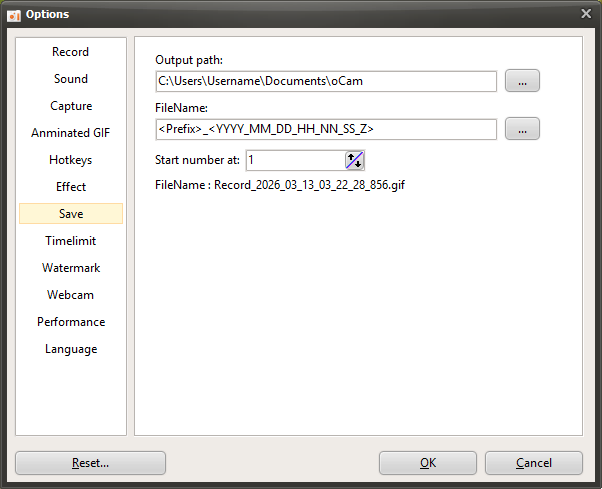
By default, the save path is set to the "This PC-Documents-oCam" folder in Windows 10, and all recordings, audio recordings, and captures are saved to this location.
The save path can be changed by clicking the button.

The file name to be saved follows a predefined format or a user-defined format, and by default it is set to "<Prefix>_<YYYY_MM_DD_HH_NN_SS_Z>".
The file name format can also be changed by clicking the button, and when you click it, you can see the predefined formats.
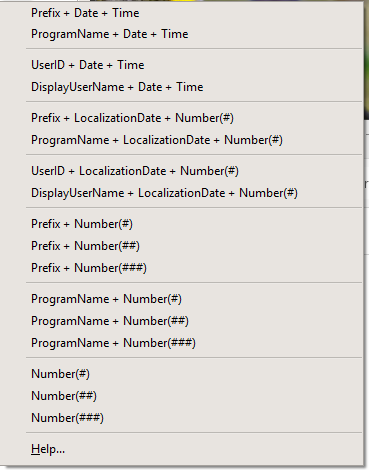
If you click the Help menu item, you can see more detailed information about the format, as shown below.
( When the Help menu item was clicked at 11:29:49.902 AM on June 16, 2016 )
<Y> = 16
<YY> = 16
<YYYY> = 2016
<M> = 6
<MM> = 06
<MMM> = 6
<MMMM> = June
<D> = 16
<DD> = 16
<DDD> = Thu
<DDDD> = Thursday
<DDDDD> = 2016-06-16
<DDDDDD> = Thursday, June 16, 2016
<C> = 2016-06-16 11:29:49 AM
<H> = 11
<HH> = 11
<N = 29
<NN> = 29
<S> = 49
<SS> = 49
<Z> = 902
<ZZZ> = 902
<T> = 11:29 AM
<TT> = 11:29:49 AM
<AM/PM> = AM
<a/p> = a
<ampm> = AM
<Prefix> = Recording
<ProgramName> = oCam
<UserID> = User Name
<DisplayUserName> =
<#> = 1
<##> = 01
<###> = 001
The file name format may feel difficult for some users, so here are a few examples.
- If the file name is <Prefix>_<#>, then <Prefix> is the prefix and # is the serial number.
The prefix is replaced with Recording when recording video, Audio when recording sound, and Capture when capturing the screen, while # is replaced with a serial number.
For example, when you finish recording the screen, a file named Recording_1 is created. ( Only if there is no similar file name in the oCam save folder. )
And when you record again, a file named Recording_2 is created. The reason the serial number becomes 2 is because a file named Recording_1 already exists.
- If the file name is <ProgramName>_<#>, then <ProgramName> represents the name of the program being recorded. In normal screen recording, it is replaced with oCam, and <#> is added as a serial number just as before.
However, when recording a game, recording starts inside the game program, so the file is created using the name of the game's executable file.
- If the file name is <dddddd>_<#>, then dddddd means the localized date, so on a Korean operating system it is replaced with the current date at the time this was written, Thursday, June 16, 2016, and # is filled in with a serial number.
The localized date varies depending on the language settings of the operating system. In other words, it appears differently on an English OS because it uses the format built into the operating system.
- If the file name is My_<#>_th_<Prefix>_File, then when recording, a file named My_1st_Recording_File is created, and when recording again, the file name becomes My_2nd_Recording_File.
- If the file name is <UserID> recorded <Prefix> of the game called <ProgramName> on <DDDDDD>. then it may be created as "AdvancedDeveloper recorded Recording of the game called LocalDeformablePRT on Thursday, June 16, 2016." The content inside <> varies depending on what is being recorded.
Serial number start means the starting number of the serial number that can be set with # inside <>.
Today's News/Tips
A Quick Look at VirtualDVD Features
Features of product
* Completely 100% FREE Software
* All supported CD/DVD/Blu-ray image formats
CloneCD (*.ccd), CDRWin (*.bin), Cue Sheets (*.cue), CDImage (*.img), ISO (*.iso),
BlindRead (*.bwt), BlindWrite (*.b5t; *.b6t), Alcohol 120% Image (*.mds;*.mdf),
Disc Juggler (*.cdi), Instant CD/DVD (*.pdi), Compressed ISO (*.isz), Nero (*.nrg),
CloneDVD (*.dvd), CDSpace6 (*.LCD), Media Data eXtended (*.MDX), Media Descriptor Sidecar(*.MDS)
* Emulate up to 24 SCSI devices in all
* Perform image mounting to local NTFS folders
* Customize virtual drives: change a drive letter, DVD region
* Support Encrypted isz(Compressed ISO) file
How to Start
VirtualDVD is very easy and simple.
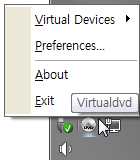
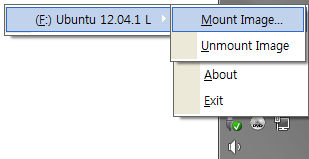
1. Click(Left or Right) the VirtualDVD's trayicon.
2. Select Menu(Virtual Devices->Mount Image).
3. Select CD/DVD Image file.
- Trayicon Menu
- Mount Image Menu
- Preferences