Recommended


What to Do If the "Cause: failed to avio_open(error=-13)" Error Occurs During Recording
Using oCam at work or school? A license is required, and it removes all ads, including this window. See the paid version →
This error may occur because AhnLab V3 or Avast falsely detects oCam as suspicious. Below is a detailed explanation of how to resolve the issue for each antivirus program.
For AhnLab V3, if oCam is being falsely detected, you can resolve the issue by adding the `oCam.exe` file in the oCam installation folder to the scan exclusion list.
1. Open the AhnLab V3 program.
2. Go to the Settings menu and find the 'Scan Exclusions' or 'Exclusion Settings' option.
3. In the 'File/Folder Exclusions' section, click the 'Add' button.
4. Go to the folder where oCam is installed, for example `C:\Program Files\oCam`, and select the `oCam.exe` file.
5. Add it to the exclusion list and save the settings.
6. Run oCam again and check whether recording works normally.
* There may also be a conflict with the anti-ransomware feature.
For example, if drive E is set as a ransomware-protected drive and oCam's save folder is also set to drive E, an error may occur during recording. This happens because the anti-ransomware feature restricts file writing on that drive, preventing oCam from saving the video file.
In this case, keep drive E as a ransomware-protected drive and set oCam's recording save folder to drive C or D instead.
Because drive E is configured as a ransomware-protected drive, file creation and modification are restricted for security purposes, so programs such as oCam are blocked from saving files there. Therefore, the simplest solution is to move the save path to drive C or another unrestricted location.
If you want to continue using drive E, you may also consider temporarily disabling the anti-ransomware setting or adding the oCam executable file (`oCam.exe`) as an exception in the security policy for that drive.
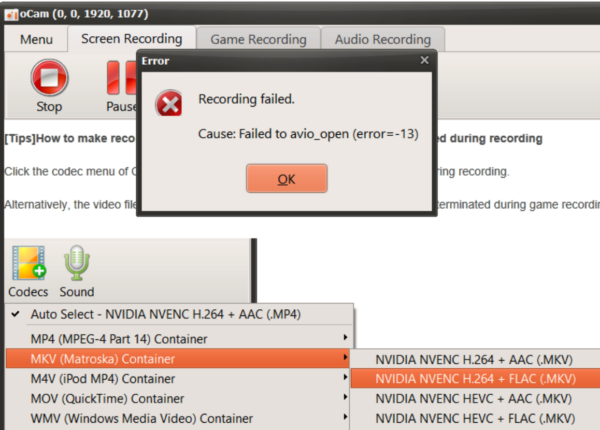
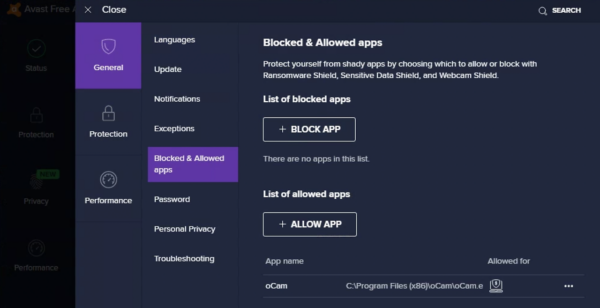
For Avast, if oCam is falsely detected, a pop-up message like the one below may appear. In that case:
1. In the pop-up, click the 'Allow App' button to register oCam as a trusted program.
2. This will remove the error and allow oCam to work normally.
If the pop-up does not appear, you can adjust the allow settings manually:
1. On the Avast main screen, click 'Menu' and then select 'Settings'.
2. Go to the 'Blocked & Allowed Apps' section.
3. Click the '+ Allow App' button and add the oCam executable file (`oCam.exe`).
4. Once oCam has been added to the allowed apps list, save the setting and run oCam again. Recording should then work without any issues.
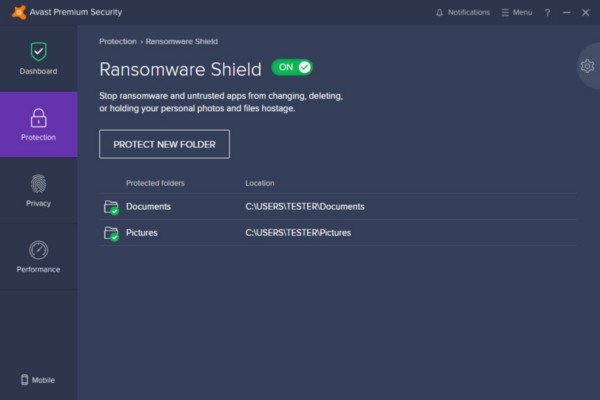
As an alternative, you can also disable part of the protection feature:
1. Open the 'Protection' menu on the Avast main screen.
2. Find the 'Ransomware Shield' option and turn it off.
3. Disabling Ransomware Shield may resolve the error related to oCam.
You can choose and apply whichever method is more convenient. If the problem continues even after changing the antivirus settings, it may also help to contact AhnLab or Avast customer support.
Programs
Another helpful tip
How to Use the x264vfw External Codec
oCam supports external codecs (VFW), and here we will look at how to use the x264 codec.
You can download the x264 codec from the site below.
https://sourceforge.net/projects/x264vfw/
Go to the site and click the Download button.
The download will start automatically.
On the installation screens, just keep clicking Next.
Accept the license agreement.
Specify the installation path.
The installation is complete.
Click Finish.
After installing the codec, you must restart oCam before it will appear in the external codec list.
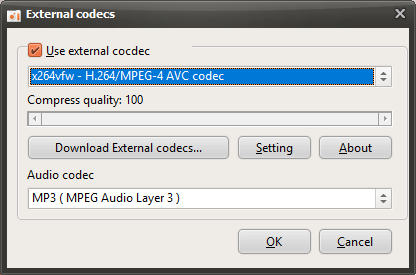
After restarting oCam, click the Codec button in the oCam main window, then click the External Codec menu.
Select the Use External Codec checkbox.
From the list, select x264vfw - H264/MPEG-4 AVC codec.
Then click the Settings button to view the detailed codec settings.
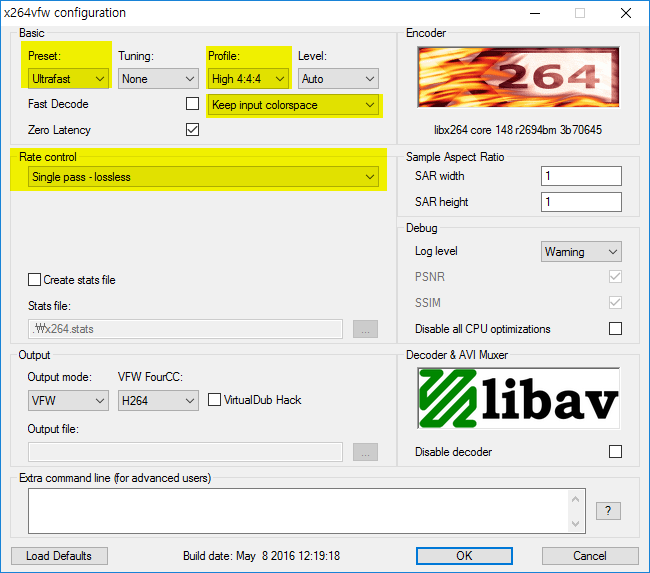
The codec settings window will appear as shown below. Since we need to record the screen in real time rather than perform normal video encoding, select Ultrafast in Preset and check the Zero Latency checkbox so that encoding is performed as quickly as possible, then click the OK button.
( This setting method is useful for real-time recording, and you can adjust it as needed depending on your situation. )
After configuring it this way, your recording will use the x264 codec.
* For game recording, if the game you want to record is 64-bit, you must also install the 64-bit version when installing x264vfw ( by default, it is installed automatically unless you change the installation options ). Then run x264vfw - Configure x264vfw64 from the Start menu and configure it the same way as described above.
* The x264vfw settings Keep/Accept only YUV 4:2:0, Keep/Accept only YUV 4:2:2, and Keep/Accept only YUV 4:4:4 are not supported, and recording will fail if you use those settings.