Recommended
 Tesla Robotaxi Reaches 8 Cities, Optimus May Be Rented, Agility Goes Public, Claude Fable and Mythos 5.2, Gemini for Healthcare
 How to Create a System Restore Point in Windows and Roll Back Your PC
 What to Check If You're Curious How Far Autonomous Driving Technology Has Come
 How to Buy Apple Products Cheaply (Latest Tips)
Download Useful External Codecs
Using oCam at work or school? A license is required, and it removes all ads, including this window. See the paid version →
If you want to use various video codecs with oCam, you can install external codecs to adjust recording quality and file formats the way you want. Below is information about the external codecs supported by oCam and how to install them. Installing external codecs allows you to use oCam more flexibly.
After installing an external codec, you must restart oCam. Once restarted, the installed codec will automatically appear under the 'External Codec' option in the oCam settings menu, where you can select it for recording. External codecs can be downloaded from the following link:
https://ohsoft.net/update/codec.php
The following are descriptions of the main external codecs supported by oCam:
Xvid Video Codec
The Xvid codec is a video codec that implements the MPEG-4 Simple Profile and Advanced Simple Profile standards. This codec offers efficient compression and high compatibility, making it suitable for creating videos that can be played on a wide range of devices and software. With Xvid, you can keep file sizes reasonable while minimizing quality loss during recording.
x264vfw Codec
x264vfw is a VfW (Video for Windows) codec that includes the widely known x264 encoder and ffh264 decoder. Based on the H.264 format, this codec can save high-quality video in a smaller file size. x264vfw is especially suitable for users who want sharp image quality and efficient compression, and it also offers excellent compatibility with various video editing software.
VP8 Codec
The VP8 codec can encode video at quality comparable to or better than H.264 video encoders. VP8 is a core component of the WebM format and is well suited for web-based video streaming or high-quality video storage. With this codec, you can reduce file size while maintaining clear image quality for efficient recording.
Lagarith Codec
Lagarith is a lossless video codec designed for video editing and archiving. As a lossless codec, it preserves the original video quality exactly, but the file size can be relatively large. Therefore, it is suitable for users who want to edit high-quality video or store it for the long term.
By installing and using external codecs in oCam, users can choose the best codec for their recording purpose and environment. For example, if you want to reduce file size, you can choose x264vfw or VP8, and if you want to create editing footage without quality loss, you can choose Lagarith. Download the codec you need from the link above, restart oCam, and apply the codec you want.
Programs
Another helpful tip
oCam Advanced Settings - Recording - Game Tab
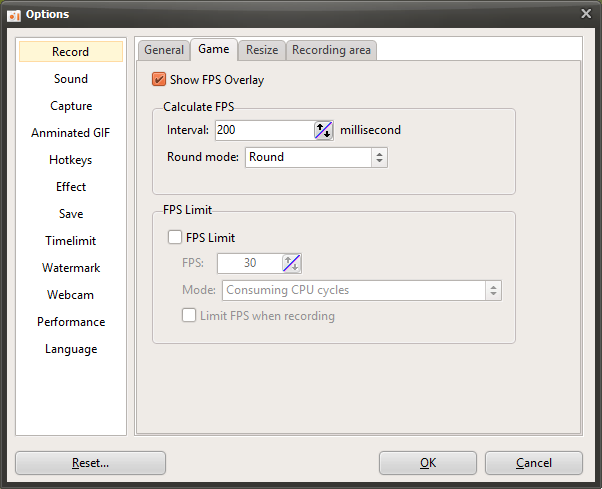
oCam is software that provides settings specialized for game recording, helping gamers and content creators capture high-quality gameplay footage with ease. In the settings window that appears when you click the "Tools - Options" menu, the "Game" tab under the "Recording" category provides detailed settings optimized specifically for game recording. The options in this tab include various features for managing gameplay frame rates (FPS) and optimizing system resources, allowing users to adjust recording to suit their own environment. Below is a detailed explanation of the main settings in the "Game" tab.
Show FPS
The "Show FPS" option determines whether the real-time FPS (frames per second) value is displayed in the top-left corner of the screen while using game recording mode. By default, this option is checked, so the FPS value appears on the screen during game recording. This feature is useful for users who want to monitor game performance in real time. For example, it helps you check whether the game is running smoothly or whether frame drops are occurring during recording. If you do not need the FPS display, you can disable this option to keep the screen cleaner.
FPS Calculation - Interval (Milliseconds)
The "FPS Calculation - Interval" setting lets you specify the time interval used to display FPS in milliseconds (ms). FPS means the number of frames drawn per second and is calculated based on 1,000 milliseconds (1 second). If the user enters a value smaller than 1,000 ms, oCam calculates and displays a predicted FPS value based on that interval. For example, if it is set to 500 ms, the FPS will be updated every 0.5 seconds. This setting is useful when you want to monitor frame rate changes in more detail.
In addition, "Rounding Mode" is an option that lets you choose how decimal values are handled when calculating FPS. You can select rounding, round up, or round down, allowing you to adjust how the FPS value is displayed. For example, if you choose rounding, the FPS will be shown as a neatly rounded whole number.
FPS Limit
"FPS Limit" is a feature that restricts the game's frame rate in game recording mode to a value specified by the user. This setting allows you to adjust the game's FPS to the level you want, which is useful for optimizing system resource usage or maintaining consistent recording quality. Two modes are provided for FPS limiting:
Consume CPU Cycles: This mode continuously uses the CPU to keep the frame rate as close as possible to the FPS value entered by the user. This method is suitable when precise FPS control is needed, such as when you want stable recording in a high-spec game. However, CPU usage may increase, so you should pay attention to system performance.
Yield to CPU: This mode limits FPS while minimizing CPU usage. It adjusts frames by using idle time, so it has the advantage of reducing CPU load, but FPS limiting may have a slight margin of error. This method is useful for users who want to save system resources or record on a lower-spec PC.
Limit FPS Only While Recording
The "Limit FPS Only While Recording" option applies the FPS limit only while recording is actually in progress. In other words, the specified FPS limit works only while recording is active after pressing the record button, and once recording stops, the game runs again at its original FPS. This setting is useful for users who want to manage gameplay and recording separately. For example, you can enjoy the game at maximum performance during normal play and limit FPS only during recording to get more stable video.
Usage Tips
The settings in the "Game" tab play a key role in balancing recording quality and system performance. For example, when recording a high-spec game, you can use the "Consume CPU Cycles" mode to set an accurate FPS limit and adjust FPS to 60 or higher for smoother footage. On the other hand, on a lower-spec system, it is better to choose the "Yield to CPU" mode to reduce resource usage. In addition, by enabling the Show FPS feature to check performance in real time, you can quickly identify frame drops or performance degradation during recording.