Recommended



How to Ensure Recorded Videos Can Be Recovered Even If the App Is Force-Closed During Recording
Using oCam at work or school? A license is required, and it removes all ads, including this window. See the paid version →
When recording video with oCam, selecting the MKV container from the Codec menu allows the video file to be saved more safely even in unexpected situations. The MKV container offers excellent file stability, so even if the program closes during recording due to various issues, the file will not be corrupted and can still be played normally.
For example, even if oCam is force-closed during recording, or if a game suddenly crashes while recording gameplay, the video file saved in the MKV container can still be played normally. This is possible because the MKV format is designed to store data in a highly stable file structure.
On the other hand, if you use the MP4 container, the file may become corrupted and impossible to recover in the same kind of abnormal shutdown situation. For stable recording, using the MKV container is recommended.
However, there are a few things to keep in mind when playing MKV files. If you play an MKV file in Windows Media Player, the seek function, such as jumping to a specific point in the video, may not work smoothly. Playback itself works without a problem, but for better seeking convenience, it is recommended to use an external video player such as PotPlayer. PotPlayer plays MKV files reliably and also supports smooth seeking.
Also, MKV files are not supported by Naver's video upload feature. Since the Naver platform does not allow MKV uploads, you will need to use a platform such as YouTube if you want to share videos on the web. YouTube supports MKV uploads without issues and provides an environment optimized for sharing and playback.
Therefore, if you want stable recording with oCam, the most effective method is to select the MKV container from the Codec menu, use an external player such as PotPlayer for playback, and use YouTube for web sharing.
Programs
Another helpful tip
How to Capture Images with oCam
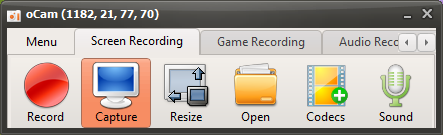
Clicking the Capture button on the main screen of oCam immediately captures the screen within the recording area you have set. This feature is very useful when you want to save a precise snapshot of a specific part of the screen. Through oCam's intuitive interface, users can freely adjust the capture area in advance and take screenshots exactly as needed by selecting the full screen, a specific window, or a custom area. This flexibility is especially useful for document work, preparing presentation materials, or for IT professionals who need to record specific UI elements.
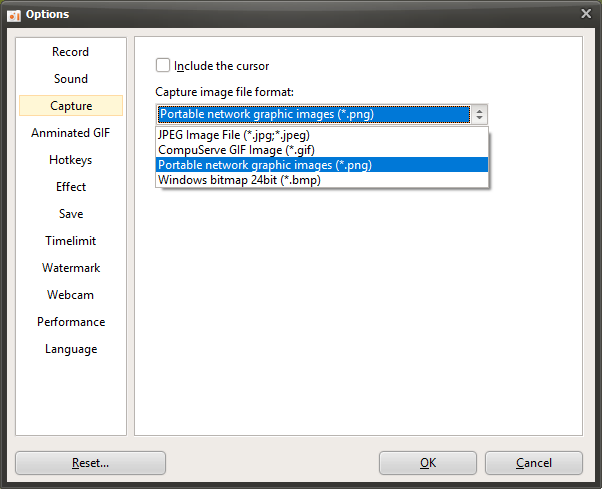
Once the capture is complete, oCam saves the image in PNG format by default, providing a sharp, high-quality result. PNG format supports lossless compression, so you can keep clear screenshots without any loss of image quality, and it is compatible with most image editing software and platforms. In the oCam settings menu, users can also change the save format to other types such as JPG or BMP, allowing them to balance file size and quality according to project requirements.
To check the captured image, click the "Open" button on the main screen of oCam. When you click this button, Windows Explorer opens automatically and shows the most recently captured file already selected. This feature helps users review and use captured images right away. Since it takes you directly to the folder where the file is saved through Windows Explorer, file management also becomes much easier.
oCam's capture feature is simple yet powerful, making it useful in a wide range of situations from everyday tasks to professional environments. For example, software developers can use it to record bugs or share UI designs, while instructors can use it to prepare teaching materials. In addition, through the oCam settings menu, you can change the save location to a custom folder or set file naming rules when capturing for more organized file management. In this way, oCam provides high-quality screenshots with simple controls and greatly improves work efficiency.