Recommended
 Windows 11 Right-Click Menu: Keep Only What You Use (New in the November Update)
 How to Find Animated GIFs: Try Using GIPHY.
 Paste From Everything You Copied – How to Use Windows Clipboard History (Win+V)
 Jensen Huang Admits Affair as Nvidia Opens Probe, METR on Anthropic, ChatGPT Images 2.6 and More
What to Do If the "Failed to get path of 64-bit Common Files directory" Error Occurs When Installing oCam
Using oCam at work or school? A license is required, and it removes all ads, including this window. See the paid version →
In some cases, you may need to modify the Windows Registry to fix an oCam setting or issue. Below is a detailed explanation of how to use the Registry Editor to add the required key values.
1. Press Windows key + R on your keyboard to open the Run dialog box.
2. Type `regedit` in the Run dialog box and click the 'OK' button to launch the Registry Editor.
3. When the Registry Editor opens, follow the instructions in the video below to complete the required settings:
4. As instructed in the video, add the following Registry key values:
- CommonFilesDir: `C:\Program Files\Common Files`
- ProgramFilesDir: `C:\Program Files`
5. After adding the Registry key values, close the Registry Editor and restart your computer to apply the changes.
Because editing the Registry directly affects system settings, it is important to back up the Registry before making changes or follow the instructions in the video exactly. The added key values help oCam reference the correct file paths and can be useful for resolving certain installation or launch issues. After completing the steps, run oCam and check whether the problem has been resolved.
Programs
Another helpful tip
How to Capture Images with oCam
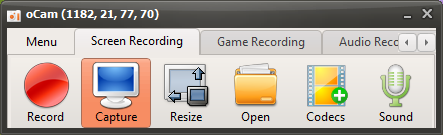
Clicking the Capture button on the main screen of oCam immediately captures the screen within the recording area you have set. This feature is very useful when you want to save a precise snapshot of a specific part of the screen. Through oCam's intuitive interface, users can freely adjust the capture area in advance and take screenshots exactly as needed by selecting the full screen, a specific window, or a custom area. This flexibility is especially useful for document work, preparing presentation materials, or for IT professionals who need to record specific UI elements.
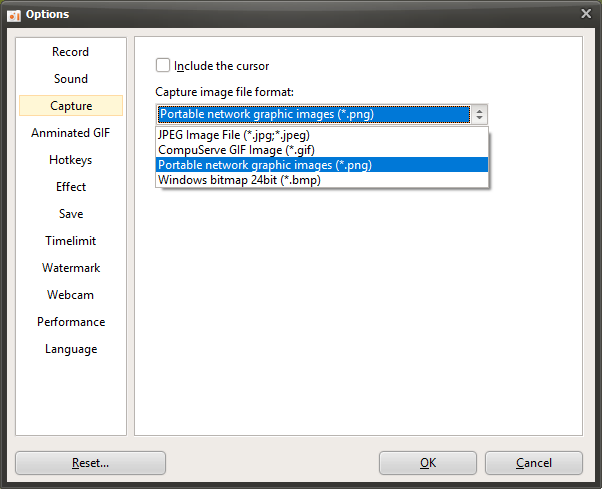
Once the capture is complete, oCam saves the image in PNG format by default, providing a sharp, high-quality result. PNG format supports lossless compression, so you can keep clear screenshots without any loss of image quality, and it is compatible with most image editing software and platforms. In the oCam settings menu, users can also change the save format to other types such as JPG or BMP, allowing them to balance file size and quality according to project requirements.
To check the captured image, click the "Open" button on the main screen of oCam. When you click this button, Windows Explorer opens automatically and shows the most recently captured file already selected. This feature helps users review and use captured images right away. Since it takes you directly to the folder where the file is saved through Windows Explorer, file management also becomes much easier.
oCam's capture feature is simple yet powerful, making it useful in a wide range of situations from everyday tasks to professional environments. For example, software developers can use it to record bugs or share UI designs, while instructors can use it to prepare teaching materials. In addition, through the oCam settings menu, you can change the save location to a custom folder or set file naming rules when capturing for more organized file management. In this way, oCam provides high-quality screenshots with simple controls and greatly improves work efficiency.