Recommended


How to Record Audio Only with oCam
Using oCam at work or school? A license is required, and it removes all ads, including this window. See the paid version →
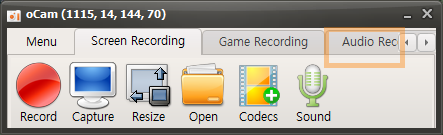
On the main screen of oCam, click the Audio Recording tab to open a simple, user-friendly menu. This menu provides various recording options in oCam, allowing users to adjust the settings as needed. One of oCam's strengths is its intuitive interface, which makes it easy to use for everyone from beginners to IT professionals.
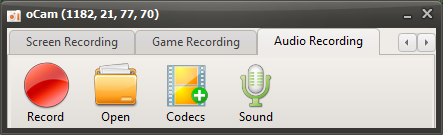
You can use this feature whenever you want to record only audio, such as for creating audio content, recording podcasts, or capturing background music.
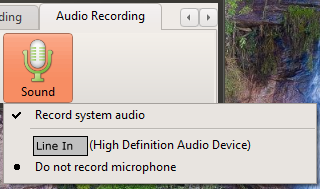
Click the Sound button to choose the audio source, such as system sound or microphone input settings, and then click the Record button on the screen to start recording. This feature is very useful for tasks where you need to focus only on audio. For example, it is efficient when you want to extract lecture audio separately, record an interview, or make a simple voice recording. Thanks to oCam's simple controls, these settings can be changed in just a few clicks, making the user experience even more convenient.
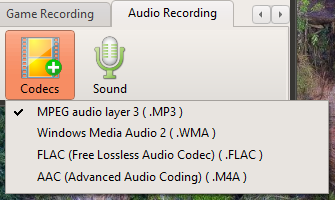
By default, audio files are saved in MP3 format. MP3 is one of the most widely used formats for audio recording because it offers small file sizes and excellent compatibility with most devices and software. It provides a good balance between sound quality and file size, making it suitable for general use. However, for users with more specific needs, oCam also provides an option to select audio codecs other than MP3 through the Codec button. If you choose AAC format, you can maintain high sound quality with efficient compression, giving you more flexibility depending on your project.
These settings clearly show how simple yet powerful oCam is. oCam is more than just a screen recording tool. It is versatile software that also supports professional audio recording tasks. Users can further adjust details such as the file save location, audio quality, and input source in the oCam settings menu. For example, you can adjust the volume levels of the microphone and system sound separately, or specify a save folder to optimize your workflow. Thanks to this flexibility and convenience, oCam is widely used in many different environments, from individual users to IT professionals. If you want high-quality audio recordings, it is recommended to adjust the codec and detailed settings to match your working environment for the best results.
Programs
Another helpful tip
How to Reduce the Size of Recorded Video Files When Recording Games (NVIDIA Codec)
If you are using the NVIDIA NVENC H.264 codec by default, the recorded file size may be very large.
Click the Codec menu in oCam to check whether you are using the NVENC H.264 codec, as shown below.
In the oCam Codec menu, click Hardware Encoder Settings.
The Hardware Encoder Settings window will appear as shown below. You can reduce the size of the recorded video file by changing the options highlighted in the yellow box.
First, let's look at how to reduce the size of the recorded file using variable bitrate.
( Rate Control must be set to 1-PASS VBR. )
The Quantizer value can be set from 1 to 51.
The lower the Quantizer value, the better the video quality, and the higher the Quantizer value, the lower the video quality.
In other words, the recording quality is defined by the range from the minimum Quantizer value to the maximum Quantizer value.
For example,
If the minimum Quantizer value is 1 and the maximum Quantizer value is 13, the recording quality range is 1 to 13.
If the minimum Quantizer value is 1 and the maximum Quantizer value is 51, the recording quality range is 1 to 51.
If the minimum Quantizer value is 13 and the maximum Quantizer value is 51, the recording quality range is 13 to 51.
In conclusion, to reduce the size of a recorded video file, increasing the minimum and maximum Quantizer values will lower the recording quality and reduce the file size.
You can adjust the Quantizer values depending on your needs, as follows.
If you want to maintain the highest recording quality while lowering the quality at certain points to reduce the size of the recorded video, set the minimum Quantizer value to 1 and set the maximum Quantizer value to a higher number depending on how much you want to reduce the quality.
( Example: Minimum Quantizer: 1, Maximum Quantizer: 30 )
If you want to maintain medium quality while lowering the quality as much as possible at certain points to reduce the size of the recorded video, set the minimum Quantizer to 26 and the maximum Quantizer value to 51.
For reference, the minimum Quantizer value cannot be greater than the maximum Quantizer value.
That is, the minimum Quantizer value <= the maximum Quantizer value.
Caution: If you set both the minimum Quantizer value and the maximum Quantizer value to 1, the recorded video file size will become extremely large, so do not use this setting.
The default values in oCam are a minimum Quantizer value of 1 and a maximum Quantizer value of 13, and we recommend setting them within the following range.
Minimum Quantizer >= 1 and Maximum Quantizer value >= 13
Next is how to reduce the size of the recorded video file using constant bitrate.
Change Rate Control to 1-PASS CBR and then set the average bitrate.
The higher the average bitrate, the better the video quality. The lower the bitrate, the lower the video quality and the smaller the recorded file size.
Finally, there is a method that uses a fixed Quantizer parameter.
Set Rate Control to 1-PASS Fixed Quantizer Parameter.
Unlike VBR, there is no concept of minimum and maximum Quantizer values, and the quality is set using a fixed Quantizer value.