Recommended


How to Fix Severe Lag When Editing Videos in Adobe Premiere
Using oCam at work or school? A license is required, and it removes all ads, including this window. See the paid version →
When recording a normal screen with oCam, there is usually no major problem, but when recording games, the average bitrate of the video file may be set excessively high. A high bitrate provides high-quality video, but it can cause severe lag when editing the file in editing software such as Adobe Premiere Pro. To fix this, you need to lower the bitrate. Below is a detailed explanation of how to reduce the bitrate and improve editing performance.
1. Adjusting the Bitrate When Using a Built-in Codec
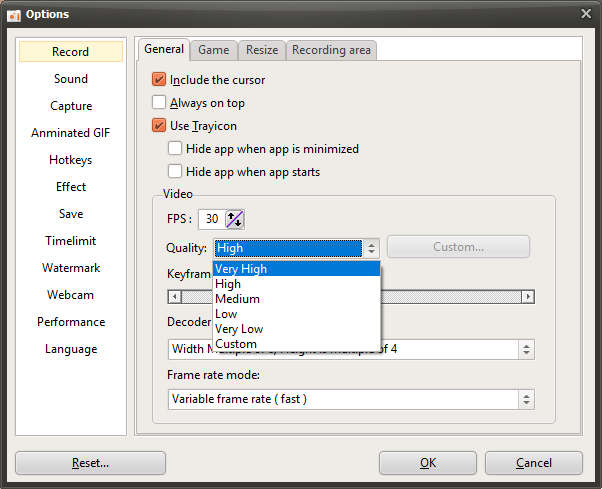
If you are using oCam's built-in codec, you can reduce the bitrate by lowering the quality setting. Follow these steps:
1. In the oCam main window, click 'Tools' in the top menu, then select 'Options'.
2. In the Settings window, go to the 'Recording' tab and check the 'General' section.
3. In the 'General' section, find the 'Quality' setting and lower the quality by adjusting the slider. The lower the quality, the lower the bitrate, which reduces the file size and decreases lag during editing.
4. Click the 'OK' button to save the settings, then try recording again.
2. Adjusting the Bitrate When Using an NVIDIA Codec
If you are using an NVIDIA hardware codec, you can adjust the bitrate directly. Follow these steps:
1. In the oCam main window, click the 'Codec' menu and select 'Hardware Encoder Settings'.
2. In the Hardware Encoder Settings window, set 'Rate Control' to '1-PASS CBR' (Constant Bit Rate).
3. Lower the 'Average Bitrate' value to a lower setting (for example, 10 Mbps or less). A lower bitrate reduces file size and improves editing performance.
4. Save the settings, restart oCam, and then start recording.
3. Re-encoding with an External Encoder
If you want to reduce the bitrate after recording in high quality without a major loss in image quality, you can record a high-quality video with oCam and then re-encode it using an external encoder program. For example, you can use PotPlayer or HandBrake. The method is as follows:
1. Record the video in your desired high-quality setting with oCam to create the video file.
2. Run PotPlayer or another encoder program, and load the video file recorded with oCam.
3. In the encoder program, re-encode it with a lower bitrate setting (for example, 5 to 10 Mbps) to create a new file.
4. Import the re-encoded file into Adobe Premiere Pro for editing. This method helps reduce file size and editing load while preserving as much of the original quality as possible.
Using the methods above, you can resolve editing issues caused by a high bitrate when recording games. If you are using a built-in codec, lower the quality setting. If you are using an NVIDIA codec, set CBR and a lower bitrate, or create an optimized file through re-encoding to achieve a smoother editing environment in Adobe Premiere. After changing the settings, make a test recording and check the result.
Programs
Another helpful tip
How to Set Recording Quality (From High Quality to Low Quality)
How to Set Recording Quality ( From High Quality to Low Quality )
Note: This setting does not apply to external codecs and only applies to oCam's built-in codecs. Lowering the recording quality will reduce the size of the recorded video file, but the video quality will also decrease.
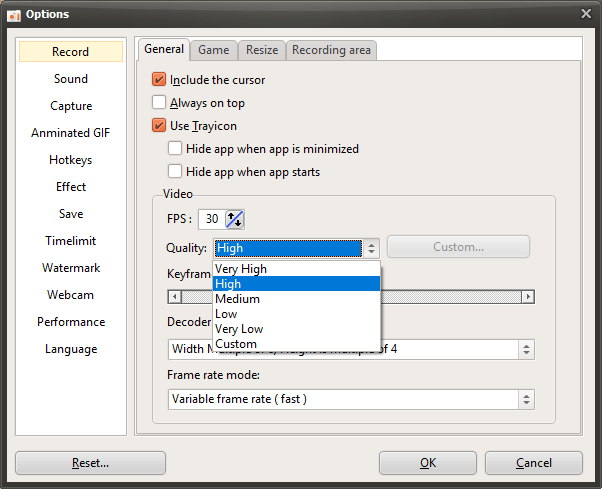
There is a menu at the top of oCam. Click Tools - Options, then click Encoding on the left, and you can select the quality as shown below. By default, it is set to Very High (high quality).
You can choose from the following quality levels when recording.
Below are captured preview images showing the recorded quality from Very High to Very Low.
Recorded at Very High

Recorded at High

Recorded at Medium

Recorded at Low
Recorded at Very Low