Recommended


What to Do If the "Failed to url_fopen" Error Message Appears and Recording Does Not Start
Using oCam at work or school? A license is required, and it removes all ads, including this window. See the paid version →
When creating a recording file in oCam, an error may occur if the file cannot be saved to the save path specified by the user. This issue is usually caused by access permissions for the save path or an incorrect path setting. Below is a detailed explanation of how to change the save path to resolve this problem.
To fix the recording file save error, the most effective method is to change oCam's save path to a different location. Please follow the steps below:
1. In the oCam main window, click 'Tools' in the top menu, then select 'Options'.
2. When the Settings window opens, click the 'Save' category in the left menu.
3. In the 'Save' tab, find the 'Save Path' item, check the currently configured path, and change it to a new location.
4. After making the change, click the 'OK' button to save the settings.
By default, it is recommended to set the save path to the Desktop. The Desktop generally has the access permissions needed for all programs to create files, so save errors are less likely to occur. For example, if you set the Desktop path to `C:\Users\[User Name]\Desktop`, in most cases the recording file will be saved without errors.
After changing the save path, restart oCam and try recording again to check whether the problem has been resolved. If the issue continues, it is also a good idea to check whether the selected folder has write permission and whether there is enough disk space.
Programs
Another helpful tip
How to Record Audio Only with oCam
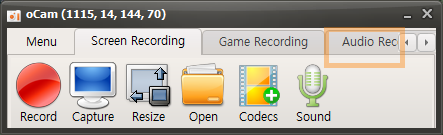
On the main screen of oCam, click the Audio Recording tab to open a simple, user-friendly menu. This menu provides various recording options in oCam, allowing users to adjust the settings as needed. One of oCam's strengths is its intuitive interface, which makes it easy to use for everyone from beginners to IT professionals.
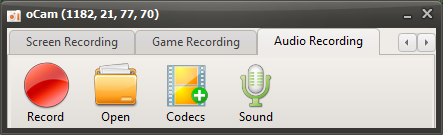
You can use this feature whenever you want to record only audio, such as for creating audio content, recording podcasts, or capturing background music.
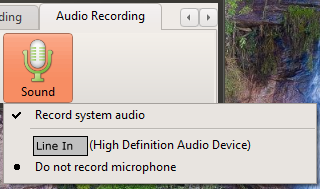
Click the Sound button to choose the audio source, such as system sound or microphone input settings, and then click the Record button on the screen to start recording. This feature is very useful for tasks where you need to focus only on audio. For example, it is efficient when you want to extract lecture audio separately, record an interview, or make a simple voice recording. Thanks to oCam's simple controls, these settings can be changed in just a few clicks, making the user experience even more convenient.
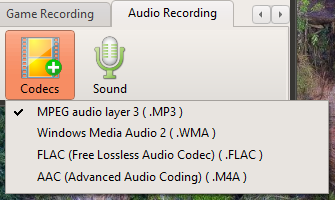
By default, audio files are saved in MP3 format. MP3 is one of the most widely used formats for audio recording because it offers small file sizes and excellent compatibility with most devices and software. It provides a good balance between sound quality and file size, making it suitable for general use. However, for users with more specific needs, oCam also provides an option to select audio codecs other than MP3 through the Codec button. If you choose AAC format, you can maintain high sound quality with efficient compression, giving you more flexibility depending on your project.
These settings clearly show how simple yet powerful oCam is. oCam is more than just a screen recording tool. It is versatile software that also supports professional audio recording tasks. Users can further adjust details such as the file save location, audio quality, and input source in the oCam settings menu. For example, you can adjust the volume levels of the microphone and system sound separately, or specify a save folder to optimize your workflow. Thanks to this flexibility and convenience, oCam is widely used in many different environments, from individual users to IT professionals. If you want high-quality audio recordings, it is recommended to adjust the codec and detailed settings to match your working environment for the best results.