Recommended




oCam Advanced Settings - Sound
Using oCam at work or school? A license is required, and it removes all ads, including this window. See the paid version →
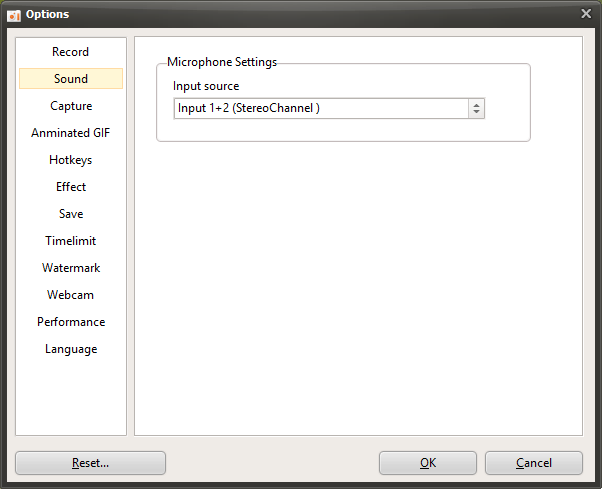
oCam is user-friendly software that not only supports screen recording but also allows you to fine-tune sound recording settings, helping you achieve optimized recording for a wide range of audio input environments. In the settings window that appears when you click the "Tools - Options" menu, selecting the "Sound" category on the left lets you check and adjust microphone-related settings. This tab is especially useful for users who need to solve microphone input issues or apply specific audio settings. Below is a detailed explanation of the settings available under the "Sound" category.
Current Microphone Settings
The "Sound" category provides options related to the current microphone settings, and by default, these settings are configured appropriately for most users, so they can usually be used reliably without any changes. In a typical recording environment, both system sound and microphone audio are recorded properly, and the default settings are generally enough to capture high-quality audio. For example, when using microphone input for lecture videos or game streaming, the default settings are sufficient for most needs.
Resolving Microphone Audio Issues
However, in certain situations, especially when using a USB audio interface or advanced audio equipment, you may encounter an issue where microphone sound is played through only one speaker, either the left or the right. This usually happens when the audio input channel settings are not configured correctly. In the "Sound" category of oCam, simple setting adjustments are provided to resolve this issue.
If sound is coming from the left speaker only: Change the microphone input source to "Input 1 (Left Channel)" to fix the problem. This setting correctly adjusts the microphone audio signal when it is focused only on the left channel, allowing balanced output through both speakers.
If sound is coming from the right speaker only: Change the microphone input source to "Input 2 (Right Channel)." This setting adjusts the audio signal coming into the right channel so that it is evenly distributed through both speakers.
These setting changes are especially useful in environments that use USB audio interfaces or stereo input, and they are an essential feature for users who want to optimize audio quality.
Usage Tips
The settings in the "Sound" category are simple, but they are very effective for resolving issues in certain audio environments. For example, streamers or content creators using a USB microphone or audio interface can quickly fix audio channel issues through these settings. After changing the settings, it is a good idea to run a short test recording to make sure the microphone audio is being recorded evenly on both channels. It is also important to adjust the microphone input level properly so that the sound is not too loud or too quiet.
If you are in a normal environment without a USB audio interface, you can usually get stable recording results just by keeping the default settings. However, if you are using advanced audio equipment, adjusting these settings to balance the audio output can be very helpful in improving the overall quality of the video.
Programs
Another helpful tip
If Avast is installed, please disable the DeepScreen feature.
When users who use Avast antivirus install or update an OhSoft program such as oCam, the installation process may repeat several times. This is caused by Avast's 'DeepScreen' feature. Below is a detailed explanation of the cause of this issue and how to resolve it.
The DeepScreen feature is triggered when there is not enough reputation information about an executable file, which can cause a program such as oCam to be recognized as suspicious. OhSoft makes efforts to maintain compatibility with antivirus software, but in this case, even though the program is functioning normally, a situation can occur where a legitimate executable file that is not malicious is unable to install or update properly because of a specific antivirus feature. This is similar to a situation where a properly developed program causes inconvenience to users because of a false positive from antivirus software.
To resolve this issue, you need to disable Avast's DeepScreen feature. Below is a step-by-step guide on how to turn off the DeepScreen feature:
1. Go to the main screen of Avast antivirus.
2. Click the 'Settings' button on the left side of the screen.
3. When the Settings window opens, select the 'Antivirus' button from the menu on the left.
4. In the 'Antivirus' section, find the 'Enable DeepScreen' checkbox and clear it.
After changing the setting, confirm that it has been saved, then try installing or updating oCam again. Once the DeepScreen feature is disabled, the repeated installation issue is likely to be resolved. If the problem continues, you may also want to apply the latest Avast updates or contact OhSoft support.