Recommended


oCam Advanced Settings - Animated GIF
Using oCam at work or school? A license is required, and it removes all ads, including this window. See the paid version →
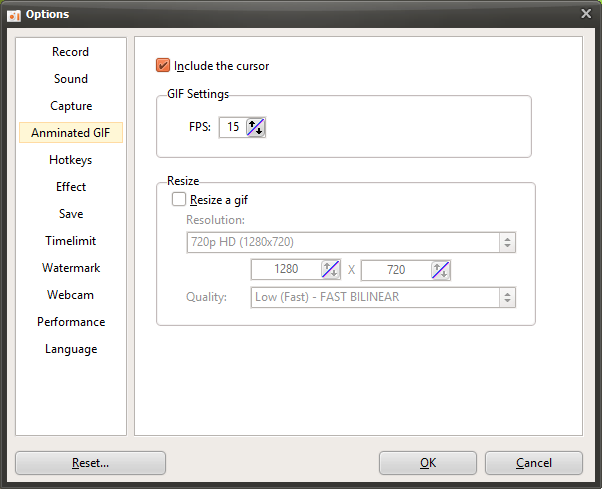
oCam is versatile software that not only supports screen recording and capture but also provides a GIF animation feature, allowing users to save short video clips as lightweight and easy-to-share GIF files. In the settings window that appears when you click the "Tools - Options" menu, the "Animated GIF" category on the left provides options for adjusting settings related to GIF creation. This tab applies when you click the "Codec" button in the main oCam window and choose the "Animated GIF (.GIF)" codec, and it is useful for optimizing the quality and format of GIF files. Below is a detailed explanation of the main settings in the "Animated GIF" category.
Overview of GIF Settings
The settings in the "Animated GIF" category are options that apply when recording in GIF format in oCam, and they are only enabled when the codec in the main window is set to "Animated GIF (.GIF)." GIF is a format suitable for sharing short animated clips on social media, websites, or messaging apps because the file size is relatively small and it can be played easily on most platforms. Through these settings, users can adjust the visual elements and quality of the GIF as needed.
Include Mouse Cursor
The "Include Mouse Cursor" option determines whether the mouse cursor will be included when recording a GIF animation. By default, this option is checked, so the mouse cursor is included in the GIF. This is useful when creating GIFs for tutorials, software demos, or situations where you want to emphasize mouse movement. For example, if you want to show the process of clicking a specific button in a GIF, including the cursor is effective. On the other hand, if the cursor is unnecessary or you want a cleaner GIF, you can disable this option to record without the cursor.
GIF Settings - FPS
The "GIF Settings - FPS" option sets the number of frames per second for the GIF animation. FPS directly affects both the smoothness of the GIF and the file size. Choosing a higher FPS, such as 30 FPS, makes the GIF play more smoothly, but the file size may become larger. On the other hand, choosing a lower FPS, such as 10 to 15 FPS, reduces the file size but may make the animation look less smooth. Users should choose an appropriate FPS based on the requirements of the sharing platform or file size limits. For example, for a short GIF uploaded to social media, 15 to 20 FPS is usually enough to get a natural-looking result.
Resize
The "Resize" option sets the output resolution of the GIF animation and works in the same way as the settings under the "Recording - Resize" tab. This setting applies only to the GIF codec and allows users to adjust the size of the GIF to the resolution they want. The supported resolution presets are as follows:
4320p UHD 8K (7680x4320), 2160p UHD 4K (3840x2160), 1440p QHD (2560x1440), 1080p FHD (1920x1080), 720p HD (1280x720), 480p (854x480), 360p (640x360), 240p (426x240), 144p (256x144), 120p (160x120), 96p (128x96)
Half Size: Reduces both the width and height of the recording area by half.
Specify Width Only and Keep Height Fixed: Sets the width while adjusting the height to match the original aspect ratio.
Specify Height Only and Keep Width Fixed: Sets the height while adjusting the width to match the original aspect ratio.
Custom: Lets the user directly enter the width and height to adjust the size exactly as desired.
Since GIF files are generally easier to share when the file size is small, it is common to choose a lower resolution such as 720p or below, or use the "Half Size" option. However, if you set a GIF to a very high resolution such as 8K, the file size can increase dramatically, so it is important to choose the settings while considering the upload limits and intended use of the platform.
Usage Tips
The settings in the "Animated GIF" category play a key role in creating GIF animations quickly and effectively. For example, if you want to make a short clip for social media, you can set the FPS to 15 to 20 and the resolution to 480p or 720p to optimize file size. Including the mouse cursor is useful when you want to highlight user actions, but if you prefer a cleaner visual style, it is better to leave the cursor out. Also, after creating a GIF, you can check the file size and, if necessary, re-record it with a lower FPS or resolution to match the limitations of the target platform.
GIF uses lossless compression, so it can maintain clear images without quality loss, but the number of colors may be limited, so it is a good idea to preview the result when recording screens with complex colors. Setting the save path in advance in oCam can also help you quickly find and use the GIF files you create.
Programs
Another helpful tip
Useful Tips for Microphone Recording in Windows 7 or Later
When recording microphone and system audio with oCam, knowing how to adjust the sound balance and audio quality is an important factor that can greatly improve recording quality. Below is a detailed guide to the settings and tips related to microphone and system audio recording.
1. If you want to record only the microphone
If you want to record only the microphone audio and exclude system audio, click the 'Sound' button in the oCam main window. In the sound settings menu, uncheck the 'Record System Audio' option. With this setting, oCam will record only the microphone input without system audio, allowing you to focus on the microphone sound.
2. If you want to record both the microphone and system audio
To record both microphone and system audio at the same time, click the 'Sound' button in the oCam main window, then select both the 'Record System Audio' and 'Microphone' options. With this setting, you can record system audio such as game sound or background music together with voice input from the microphone, such as commentary or conversation. This is useful when you want to create a video in which both sounds blend naturally.
3. If the microphone volume is too low
If the microphone volume is too low and hard to hear, you can adjust the microphone volume through the Windows sound settings. Follow the steps below:
- Open 'Control Panel' from the Start menu and click 'Sound'.
- In the Sound settings window, go to the 'Recording' tab.
- Find the microphone you are using in the list of recording devices and double-click it to open the 'Microphone Properties' window.
- In the 'Levels' tab, adjust the 'Microphone Volume' slider to increase the base volume, and if necessary, enable the 'Microphone Boost' option to make the sound louder. With this setting, the microphone audio will be recorded more clearly and at a higher volume.
4. If the system audio is too loud and drowns out the microphone
If the recorded system audio is too loud and makes the microphone hard to hear, you should reduce the system audio volume. You can use the following two methods for this:
- Adjust the volume inside the playback program: If the program producing the system audio, such as a game or media player, has its own volume control option, lower the volume in that program. This reduces the system audio level during recording and helps balance it with the microphone audio.
- Use the Windows Volume Mixer: If the program itself does not allow volume adjustment, right-click the speaker icon in the tray at the bottom right of the taskbar. From the menu that appears, select 'Open Volume Mixer'. This will open the mixer window, where you can adjust the volume of each currently running program individually. Lower the volume slider for that program to reduce the system audio.
*Note*: Lowering the overall Windows speaker volume does not affect the volume of the recorded sound, so you must adjust the volume of the individual program.
5. If increasing the microphone volume only increases noise and the audio quality is poor
If you increased the microphone volume as described in section 3 but the noise became worse or the audio quality is still unsatisfactory, then instead of forcing the microphone volume too high, you should also reduce the system audio appropriately. As explained in section 4, lower the system audio volume to balance it with the microphone audio so that the microphone voice can be heard more clearly. During this process, carefully adjust the balance between the microphone and system audio to find the best sound quality.
6. If you want to further improve microphone quality or completely remove noise
If you want to maximize microphone quality or reduce noise, software settings alone may have limitations. In that case, the most effective solution is to purchase a professional audio interface and a high-quality microphone. Many standard microphones produce a lot of noise or have low audio quality, making it difficult to fully compensate through software. Therefore, using a high-quality audio interface and a matching microphone can give you clear audio with minimal noise. For example, combining a condenser microphone with a USB audio interface can deliver professional-level recording quality.
Use the methods above to adjust the microphone and system audio in oCam the way you want and create the best recording environment. By fine-tuning each setting carefully, you can record better sound quality and more balanced audio.